Setting up a local MySQL and MongoDB server for testing or practicing
Hey everyone, For this tutorial type blog, I will be assuming that you all have no idea what containerization is nor do you know what virtual machines are. You all have probably heard of them but have no idea how they work or the difference between VMs and containers. So lets start of with that. I obviously will not be technically explaining this but will just provide you with an overview of it.
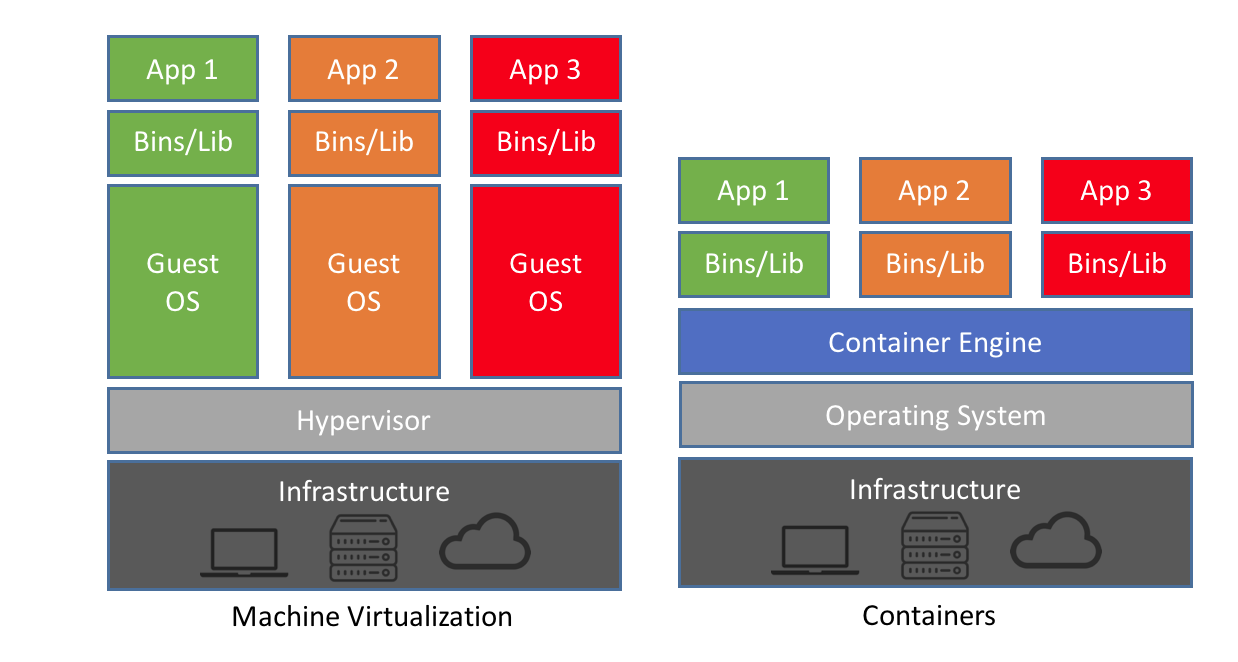
VMs are entire operating systems running on emulated hardware or shared hardware. This means that it requires time to boot up, looses efficiency when running, due to emulation or sharing. However, since it is running it’s own operating system, it is isolated from the host system. This provides you with hard security. Containers on the other hand dont run a full operating system, it can use the system’s own kernel and then run software in a isolated environment. This obviously is much faster as there is no booting of the device required and the hardware is not shared but rather the container runs like an app on the system. This makes containers very attractive. Hovever, though containers are quite secure, they are not as secure as VMs.

Docker is an example of a containerizing software. It requires a linux kernel. This is not a problem on MAC OS or Linux based operating systems. On Windows, you need to have Windows 10 2004 release or later and have WSL2 enabled and installed. WSL2 stands for Windows Subsystem for Linux 2. It is a great development tool for people on Windows, however, that is for another blog.
Prerequisites
Docker and docker-compose needs to be installed. For people on windows and MacOS, the docker engine comes with docker-compose as well, so you need not worry about it. Linux users have to install both seperately. The installation is pretty straight forward and I will not explain it here. However, if you need help please look at their documentation.
You would also prefer to interact with the servers through a GUI. For MySQL, MySQL Workbench is very good and is free. MongoDB has Robo3T. It is a basic GUI but has a lot of functionality for beginers and experts alike. These tools will come in handy later.
Starting the Servers
After you have finished installing the perequisites mentioned above, you could download the source code from here. This is a link to a github source I have published which contains everything you need to start the servers. It also has some example scripts which you can test out. Download the scripts as a zip or clone the repository. In the folder you will find the names of all the servers you could generate. Namely there is MySQL, MongoDB and Neo4j. Make sure you have a internet connection the first time you start the server because docker will download containers from the web. Once it is downloaded, it is stored locally on your system. So, next time you try to run the server, it does not re-downlaod the entire container again.
After you download the source code open the folder, which server you want to run. Here, open up a terminal window. i.e powershell on windows and terminal on linux and macos. Recheck that you are in the current directory by using the pwd command. This should list out the directory you are in. The directory should contain a file named “docker-compose.yml” This file neednot be tampered with to run the server. In the terminal type the following
docker-compose up
This should start the server. The details on which port the server is running, and the default username and passwords, can be found in the readme file on the github link. The summary is that the ports are the default ports for each server and can be accessed at localhost:<PortNo>. The default username is “root” and is obviously the administrative/root user and the default password is “password” for all servers.
Once you are done with working with the server, you can shut it down by running the code
docker-compose down
This will shut down the server. Again, for this to work, the current working directory in the command shell should be the directory with the name of the server. The “docker-compose.yml” file is required to start or stop the specific server. All these files are different and cannot be interchanged. They are specific for each server.
Conclusion
I hope this blog post was able to get you up and running with your initial servers. There will be further blogs on how you can set up your database to be accessable through the internet so that other users can connect to your server. This is usually done through port forwarding but many people suggest buying a static ip which is not really required for testing. IPv6 is required to be enabled on your system for most internet service providors though. But that is usually the default scenario for all modern systems. As long as your system is from this decade, you will have no problems with IPv6.
See you all in a further blog.